1. Introduction to PyTorch
1.1 Computational Graph
- 연산과정을 그래프로 표현한 것

- Define and Run
그래프를 먼저 정의한 후 실행 시점에 데이터 feed - Define by Run(Pytorch 방식)
실행을 하면서 그래프를 생성
즉시 확인 가능 $\rightarrow$ pythonic code
1.2 Trend
- Tensorflow -> Torch
- 편하고 작성하기 쉽고, 디버깅이 더 쉽다
- Numpy + Autograd + Function
- Tensor를 numpy처럼 다룰 수 있다
- 자동으로 미분! DL 연산지원
- 다양한 형태의 DL을 지원하는 함수와 모델을 지원
- Tensorflow가 production과 scalability의 장점을 가진다고 하는데, 요즘은 torch도 production API가 잘 구축되어가는 추세인 것 같다
2. PyTorchBasics
2.1 Numpy to Tensor
import numpy as np
# Numpy array 생성
n_array = np.arange(10).reshape(2,5)
print(n_array)
print("ndim: ", n_array.ndim, "shape: ", n_array.shape)

Output
------
[[0 1 2 3 4]
 [5 6 7 8 9]]
ndim:  2 shape:  (2, 5)
import torch
# numpy array Tensor로 변경 (list도 사용가능)
# torch.Tensor(x, dtype=?) 다양한 데이터 타입 사용가능
    # ? - torch.float32(=torch.float), torch.float64(=torch.double)
    # - torch.complex32, torch.complex64
    # - torch.int64, ...
# torch.FloatTensor(n_array) -> CPU
# torch.cuda.FloatTensor(n_array) -> GPU
t_array = torch.FloatTensor(n_array)
print(t_array)
print("ndim: ", t_array.ndim, "shape: ", t_array.shape)

Output
------
tensor([[0., 1., 2., 3., 4.],
        [5., 6., 7., 8., 9.]])
ndim:  2 shape:  torch.Size([2, 5])
2.2 Tensor methods
- flatten
# shape를 평평하게 1차원으로 변경
t_array.flatten()

Output
------
tensor([0., 1., 2., 3., 4., 5., 6., 7., 8., 9.])
- ones_like
# 동일한 모양의 1로 채워진 Tensor 생성
torch.ones_like(t_array)

Output
------
tensor([[1., 1., 1., 1., 1.],
        [1., 1., 1., 1., 1.]])
- view => reshape 대신 view를 쓰는게 좋다 (why?)
- view는 변환후 메모리 주소 반환 -> 원하는데로 변형 후 변화값 반영을 항상 보장 가는
- reshape은 모양이 바뀌면 복사한 값을 반환
# view
a = torch.zeros(3,2)
b = a.view(6)
a.fill_(1)
print(b)

Output
------
tensor([1., 1., 1., 1., 1., 1.])

# reshpe
a = torch.zeros(3,2)
b = a.t().reshape(6)
a.fill_(1)
print(b)

Output
------
tensor([0., 0., 0., 0., 0., 0.])
-
squeeze, unsqueeze -> 1인 차원 축소, 증가
-
numpy의 함수들을 대부분 동일하게 구현되어있음 라이브러리
2.3 Tensor operation
- 사칙연산은 numpy와 동일하게 사용가능
- dot, matmul-> matmul을 사용하자!
n1 = np.arange(12).reshape(3,4)
n2 = np.arange(12).reshape(4,3)
t1 = torch.FloatTensor(n1)
t2 = torch.FloatTensor(n2)

# dot 내적
t1.dot(t2)

Output
------
Runtime Error

# matmul 행렬간 연산
t1.matmul(t2)

Output
------
tensor([[ 42.,  48.,  54.],
        [114., 136., 158.],
        [186., 224., 262.]])
2.4 GPU활용하기
# GPU에 Tensor 올리기
if torch.cuda.is_available():
    tensor_data = tensor_data.to("cuda")
2.5 ML/DL formula
- nn.functional 모듈: 다양한 수식 변환 지원
import torch.nn.functional as F
...
F.sotfmax(tensor, dim=0)

output
------
tensor([확률 값1, 확률 값2, ...])

...
F.one_hot(y_label)

output
------
tensor([[1,0,0],
        [0,1,0],
        [0,0,1]])
2.6 AutoGrad
- requires_grad=True : False면 계산 불가
- 미분을 하지 않겠다, 파라미터 업데이트를 안하겠다는 의미 ```python w = torch.tensor(2.0, requires_grad=True) y = w*2 z = 10y + 2 z.backward() w.grad # w에 대해서 미분하고, w에 2.0을 대입하면?!
output
tensor(40.) ```
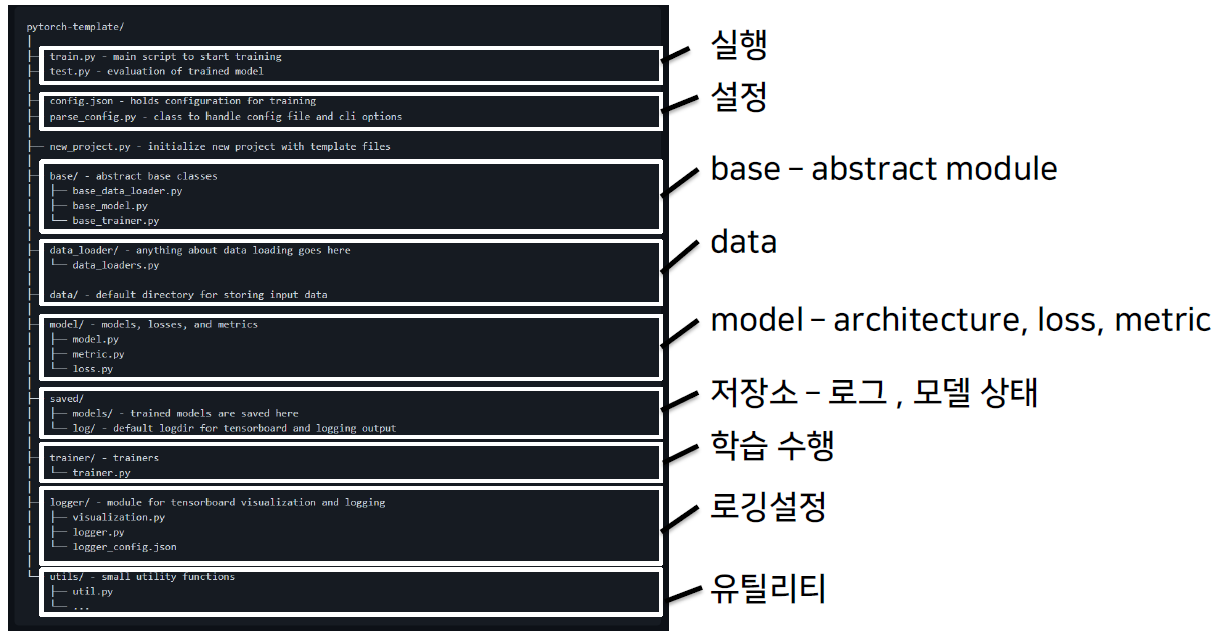
3. 프로젝트 구조 이해하기
3.1 Overview
- 언제까지 jupyter notebook을 사용할 수 없다
- 배포, 공유가 어렵다
- 재현이 어렵고, 실행순서가 꼬일 수 있다
- 유지보수가 불편하다
- 실행, 데이터, 모델, 설정, 로깅, 지표, 유틸리티 등 모듈화 필요
- 추천 Template
- https://github.com/FrancescoSaverioZuppichini/PyTorch-DeepDeep-LearningLearning-Template
- https://github.com/PyTorchLightning/deep-learninglearning-projectproject-template
- https://github.com/victoresque/pytorch-template ✅이거 기준